How I work

How I Bullet Journal (Part 2)

In Part 1 I talked about some of the reasons I started a Bullet Journal (BuJo) and showed how I set up a new BuJo. If you haven’t checked that post out I recommend you start there. This time I will drill into several sections of my BuJo that are the workhorses: daily log, project spreads, and templates.

In David Carroll’s set up video you see that the daily log is set up with the day’s date and a list of items underneath. I like that every tasks always falls under a date when added to the daily log. This is a great way to determine if an older task is still needed or if that opportunity or need is expired. I use a similar format to Mr. Carroll’s, but I’ve added my own… embellishments to it in order to make the system a little easier to review. Here is what my Daily Log typically looks like:

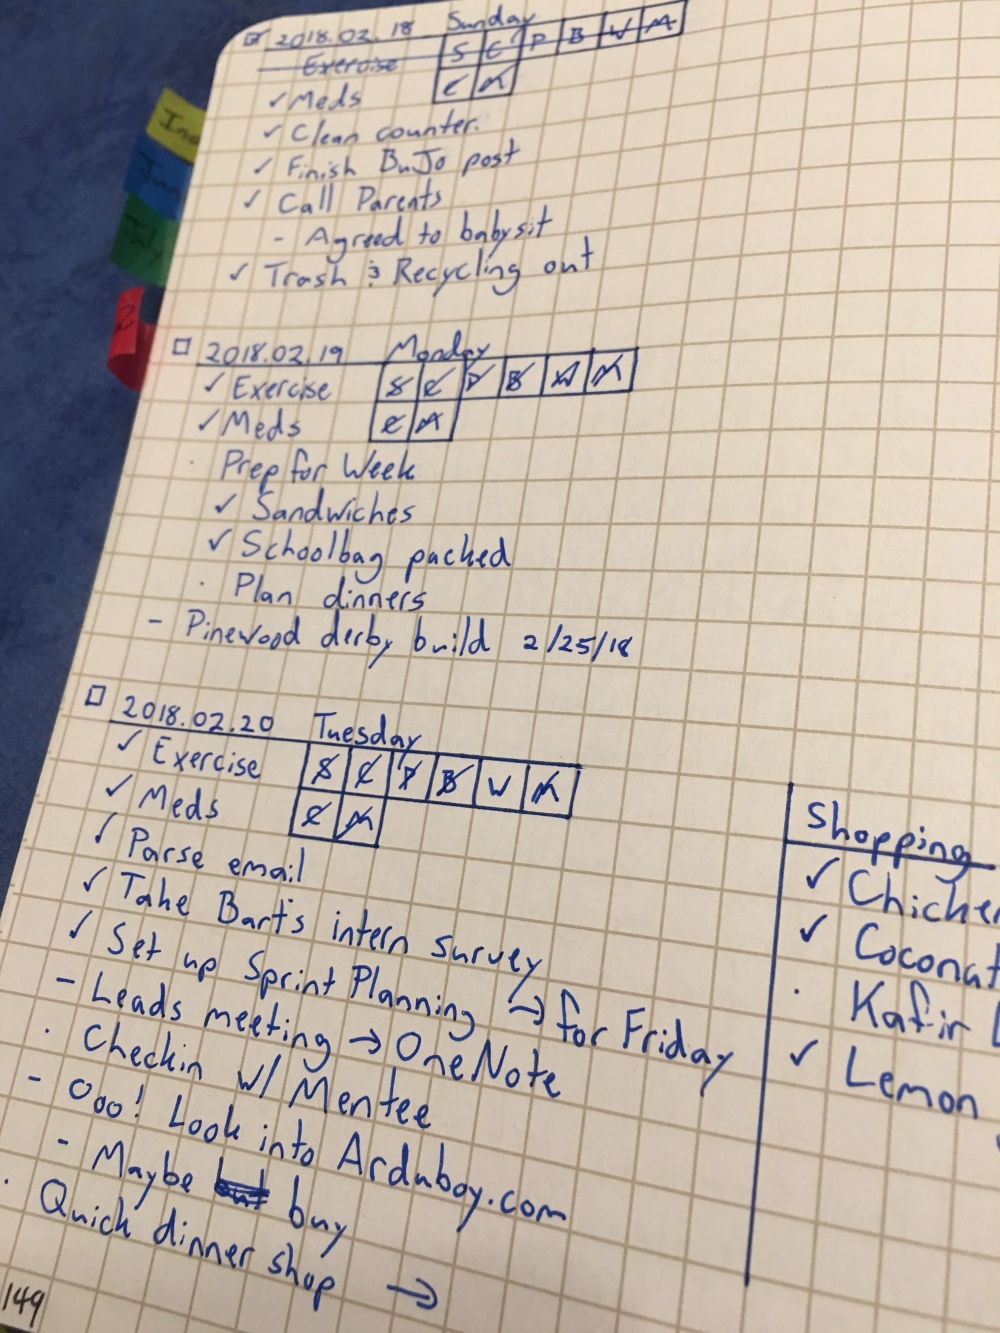
Each day’s entry starts with a check box, the date in YYYY.MM.DD format (Hey, I’m a programmer), and the day of the week. Below that is where the daily notes start. These are mostly tasks with occasional meetings and notes underneath.

During the day tasks are added and checked off, notes are taken, and work gets done. That does not mean every item in the daily log gets done that day. Keeping track of these open tasks after that day can be difficult as often hide among the completed items. This problem screamed for a simple solution. I tried weekly migrations to a weekly spread, but that  just ate up space, became a dumping ground, and was ignored. I then tried to use the monthly spread or future log weekly instead, but that just clogged those pages with tasks in a similar way to the weekly spread.

My current solution is the check box. The box  in front of the date is checked off if the last task under that date is completed and the box is left empty if not. When I get a spare moment I page backward to look for days with an open check box. When I see one I look for each remaining task and determine if they are still necessary. If they aren’t I strike them out. If that task still needs to get done then I determine how to resolve it. If the weekly review comes along and a task is still around I determine if I should migrate it to the future or monthly log, but more often I strike the task and break it into sub-tasks and add those to the current day. I call the “breaking down a task” and will talk more on that in a later post.

Another feature of my Daily Log are the boxed letters next to a task. These are the sub-tasks that are typically associated with the task. For instance the daily task “Exercise” contains the daily sub-tasks: steps, cycle, planks, bands, weights, and meditation. Note that not all of these sub-tasks need not be completed to complete the task, though that is the preferred case. Instead this is checked off when the day is done because I cannot make up that task on another day. It is usually checked off on the following day (or on completion, yay!) This is a space efficient way to track a task with common sub-tasks. I use the same format when I need to disseminate information to all of my reports at work and need to make sure I conveyed it to all of them.

Before moving on, you may have noticed that I use indenting throughout my notes. Typically this is for events, but I may indent and outline additional notes or tasks under any note or task in my BuJo. If I come to an item and realize there are sub-tasks under it and there is no more space I will usually draw an arrow pointing to the sub-tasks (perhaps to the side, like the grocery list above) or use a new spread.

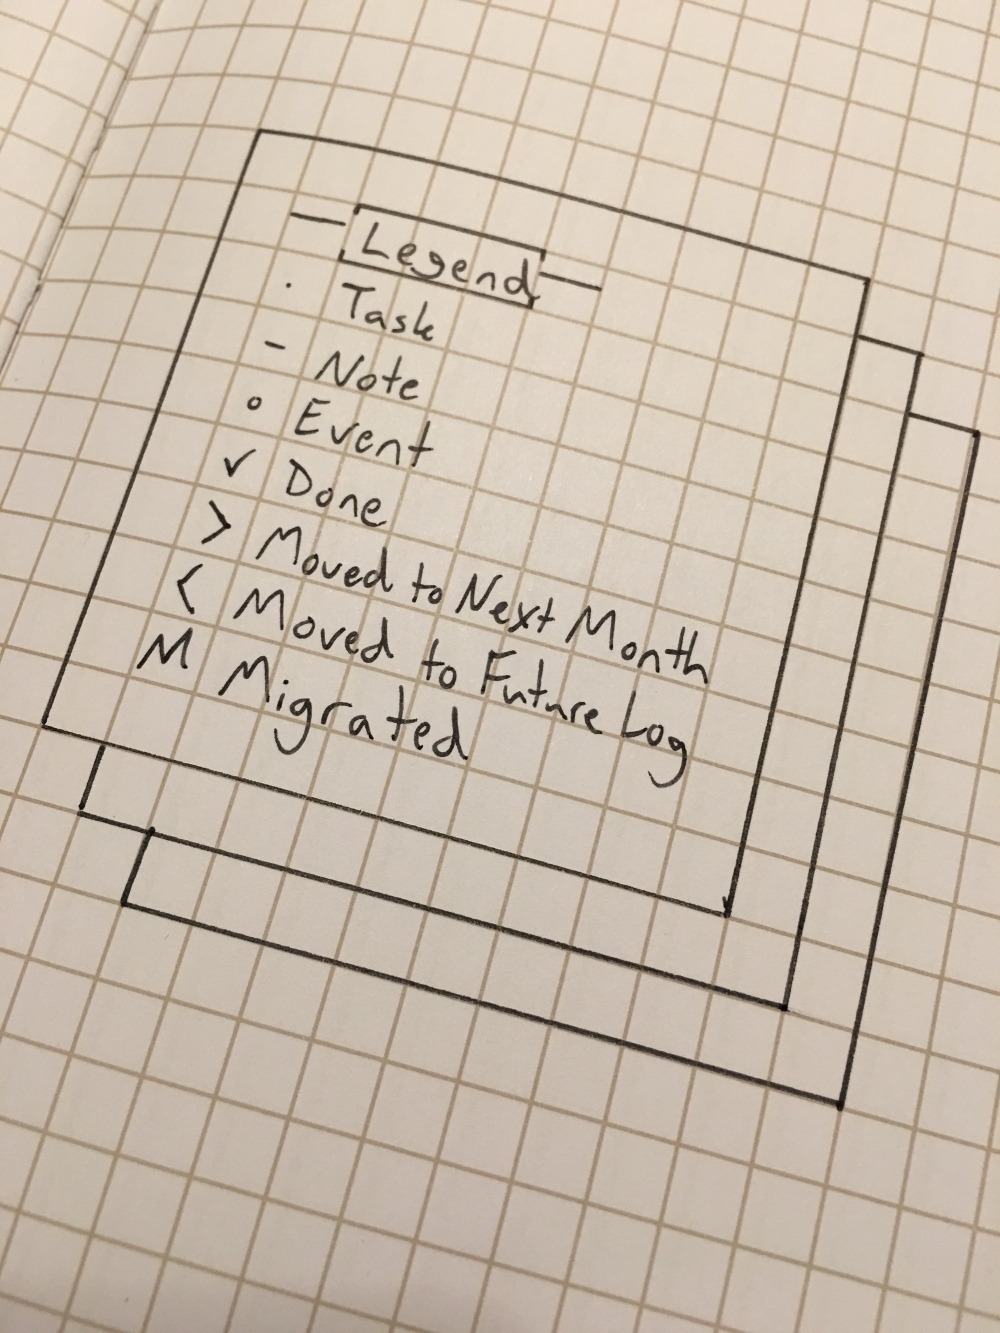
There are only a handful of symbols I use in my  BuJo, because I like to keep things simple. I use the standard set (as you can see below) and also added the “M” symbol which I use for BuJo migration (which I will talk about in a separate post later).

Now for the project spread. I tend to fall into the Getting Things Done (GTD) mode of thinking of everything with more than one step as a project consisting of multiple steps. This is why I tend to have small lists of sub-tasks throughout my Daily Log. Frankly, the best thing to come out of GTD for me was the ability to determine next actions and splitting large tasks into smaller sub-tasks (more on that in a later post). For this reason I use the Project Spread format throughout my book. Here is a typical example:

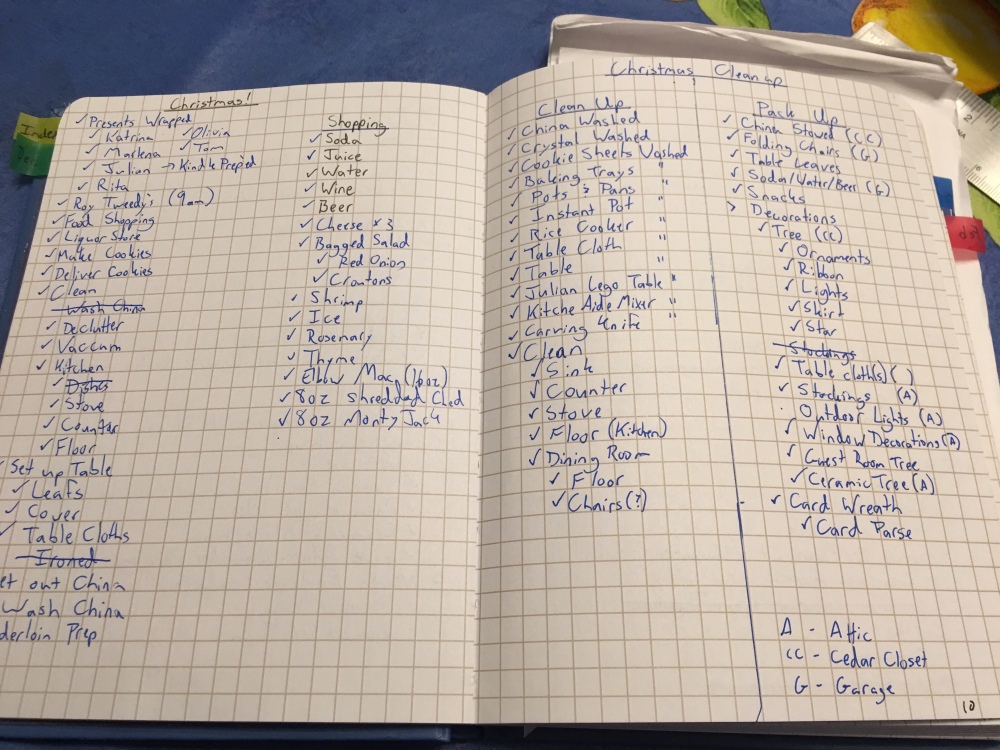
I wrote this up going into the weekend before Christmas to plan for the assault on my house (just like Kevin McCallister). Note how I broke up all the large tasks and used side areas to build small lists, like the food shopping. This is a typical looking Project page for tracking tasks and notes. Sometimes a large project may fill a page, or updates may remove the need for a bunch of tasks laid out. In that case I’ll use my page markers discussed in my first post and create a new spread (marked in my index) and carry on.

Project pages don’t necessarily only contain notes and tasks however. I have also used them for brainstorming. My preferred method is lists (ex. pros and cons) or mind mapping. Mind mapping has helped me on a number of occasions when there is a topic or area I need to break apart into smaller  areas. This is a great way to decompose a problem into the simple steps needed to complete the work. Here is an example where I was planning and then tracking my progress in a couple areas last year.

This was built off of a component of the Passion Planner style of journal mixed with my own ideas around formulating a five year plan. Here you can see the idea I had for what I would like to do over the next couple years as well as the areas I wanted to focus on. It looks like a simple layout, but really it was an evolving diagram over the course of a couple of days. The results of which influenced the creation of new project spreads, daily log entries, and other changes in my life.

Before closing out this post, I want to talk about template pages. Early on every spread in my BuJo was created by hand. For example, each trip would have its own spread drawn up for what needed to be packed. Then I went on a lot of trips in a short period, which meant I was duplicating these spreads multiple times. I’m a programmer which means I hate duplication (after all, repetition is a computers job).

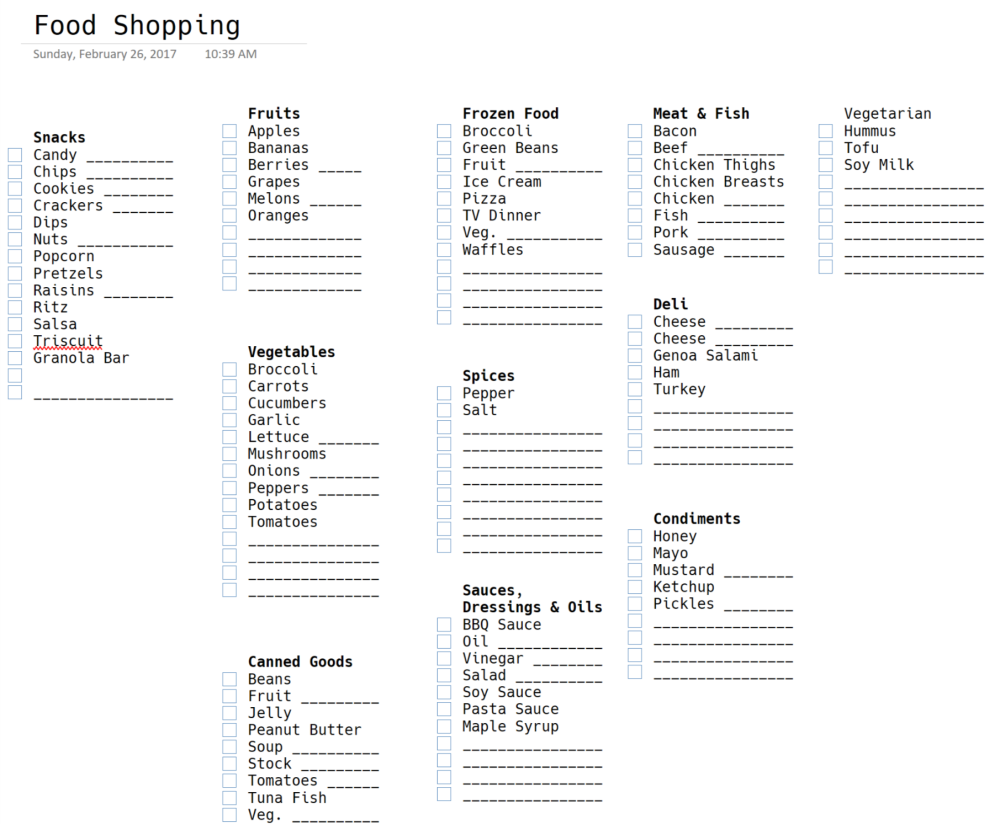
This resulted in the creation of templates which could be printed out when needed and taped into my BuJo. This gave consistent lists in a standardized format that will never have any items missing due to oversight. Templates are used for any spread that is common and duplicated. Packing lists, grocery lists, yearly house maintenance lists, etc. I use OneNote to create these lists (as I like the editing and formatting when printing, plus the OneNote organization system is aces). Below is my shopping list template as an example.

Food Shopping

Despite writing two posts and over 3,000 words on my BuJo system, I’m still scratching the surface. In future posts I’ll discuss the tools I’ve used, templates I’ve created, handling migration to a new BuJo, my experiences with using a digital Bullet Journal, and what makes up a good task.

How I work

How I Bullet Journal (Part 1)

“The faintest ink is more powerful than the strongest memory.”

– Chinese Proverb

As mentioned in my intro post I read Getting Things Done (GTD) in 2008 and it changed the way I approached note taking and list making. Prior to GTD I kept lists and notes, but didn’t respect them. Whether it was a folder piece of printer paper or a legal pad, often the notes and lists were written, assumed committed to memory, and ignored. This was tolerable early in my career, but at that time I was starting to build complex software systems and often needed more time to finish the work. GTD was my first steps into proper long term note taking and to do lists.

But GTD wasn’t always a great fit for me and the nature of the lists kept getting more difficult. Clean up and resorting going through notebooks quicker as well as hiding what is needed.

I stumbled upon Bullet Journaling (BuJo) in 2016 and decided to give it a shot. I’m now on my third BuJo and love the system. What makes it work for me is how space efficient it is, and that I can quickly make up to do lists or brainstorm ideas without figuring out the best place to do that. I just open a new page and get started, noting it in my index.

BuJo
It’s an older Bullet Journal, but it checks out.

Before getting into how I customized my BuJo system to my needs I recommend taking a look at the How to Bullet Journal created by Ryder Carroll. It will show you the basics and how to set up a simple BuJo.

Back? Great! Let’s dive in!

Setting up the Book

Currently I am using a graph “Project” notebook by Hallmark. It is 160 pages with a 1/4” graph paper. What I like best about it is the pen loop and rear interior pocket. These prove incredibly helpful in keeping my necessary supplies around my BuJo. They’ve held up to great abuse, and the form factor is just about perfect. Sadly Hallmark has discontinued these, but occasionally one will appear on a discount rack, where I will promptly snatch it up for my stockpile. I figure there are enough to last at least another year or two.

After taking the fresh journal off the self I immediately write, “The First page is profound” and “Nothing doesn’t go in here” on the first page of the book. This is a trick I picked up from Merlin Mann to overcome the writers block of a new notebook. The idea is that you mark up the new notebook immediately and with something incredibly insightful to get over all of these blank pages staring at you. So your drivel on page later on doesn’t matter.

The first page is profound
The first page is profound and a double negative to throw off that inner critic as well ^_^

Next I number all the pages, bottom exterior corner second full square in. Placement is critical for tracking the different spreads (I’ll show how later in this post). Lastly I glue in a ribbon to act as my bookmark. I use a little crazy glue on the last two pages. It makes the pages less useful, but I don’t mind as I rarely get to every page anyway.

Once that is done comes the basic BuJo set up. I create my index page on pages 2 and 3. Then my future log on pages 4-7 with a monthly spread for the starting month on page 8 (note: A “spread” are the two pages currently opened to in the journal). For the future log I add monthly calendars, a touch that i  often flip to and can show a date faster than those flipping around on their phones or tablets.

Future Log
I have four pages set up with three months each on them. Important dates and to do’s are written down next to the month.

For my monthly spread I keep it pretty basic, like in David Carroll’s video above. In the past I have tried to make it look like a calendar along with other artistic flourishes. In the end it was just too hard to squeeze the information into the calendar and fancy layouts. So I keep it simple.

At this point the bullet Journal is ready to start my daily logging. I don’t get fancy by creating a weekly layout ahead of time. Trying that early on revealed some days produce fewer to do’s  while single meetings could fill two pages! This variance prevents me from laying out my week in advance.

When these pages inevitably fill the current spread, I turn to the next pair of blank pages. Remember that spacing for my page numbers? Well this is where I use that extra space. I write the page number of the just filled spread to the left with an arrow pointing away from the current page number. Then I flip back to that finished spread and write the next spread’s page number with an arrow pointing away. Now I have an easy indicator to show where to quickly find the previous daily spreads throughout the book!

Page Numbering
The black ink is the current page number. The arrow indicates that this page is continued on page 15.

I use fresh spreads for specific projects, long meetings, or other tasks that should be grouped together. When I create those pages I copy their starting page number into my index. The index is really what makes the BuJo shine. Simply looking up  the page number in the beginning of the book makes navigation so fast. I also help it along by using page markers on the Index and monthly spreads so I can hunt down a specific daily entry.

Tagged
My page marker tagging system in all of it’s glory!

Then comes my special pages. These are spreads that I always include in my BuJo as I enjoy using them to track certain related items. In GTD there is the concept of the weekly review. A weekly review is when you go over your lists and prune and update tasks as needed. By reviewing your tasks weekly you see if there is anything left open, or brainstorm to see if there was anything that you need to add to your system. I use the following pages to keep me on track with my longer term plans that I would like to fulfill and review them weekly.

Books to Read

This is a stylized bookshelf where I write the titles for the books I want to get to. Once read I color them in, thereby keeping a living list of books read and those I want to get to. This idea originally came from Pinterest and I fell in love with the idea of having a book shelf always on hand. I never finish all the books here, but that is okay. I simply flush, or clear, the bookshelf when I migrate to a new BuJo and start again.

My Bookshelf Spread
Empty books for future books to be added. Finished books are colored in.

Things Borrowed/Things Loaned

This is a simple two column format used for tracking the things I’ve borrowed and things I’ve loaned out. I write the item borrowed or loaned next to a task bullet and the person from whom or to whom the item is associated with. I used to include the date, but stopped as it wasn’t that useful. Instead I use a signifier to indicate if the item is needed back urgently.

Tracking what is loaned or borrowed
Things borrowed and loaned out. I’m either doing really well right now, or I forgot to add some things <.<

Bucket List

I have stylized this in the past, but the truth is it works much better as a simple list. Recently I have also started to record the items knocked off previous BuJo Bucket Lists as well.

Bucket List
This list is always growing and sometimes things simply come off of it. For instance, I am thinking of removing “Get a Tattoo” as it seems to be more counter culture to not have a tattoo these days (I’m such a rebel!)

Games

I liked the bookshelf spread for my books so much that I started one up for games I wanted to play. A shelf didn’t seem right, so I came up with a NES cartridge inspired layout. These don’t get knocked off as easily as the books, so I simply write a comment on my feelings when I stopped with the game. Some games get their own spread and the associated page is linked to the game.

My Games Spread
My gaming spread. Some of these are long running favorites (like Minecraft and Skyrim) most are games I haven’t been able to get to yet.

And there you have it. A quick tour through how I use the Bullet Journal system to keep track of things. Next time I’ll go a little more into depth on how I use the daily spreads, how I set up my project spreads, and what tools I use.